Archives for category: Tutorials

>

Anthropologie Knock Off
Vintage Yo Yo Bobby Pins
{As seen on the fabulous Kojo Designs}
I originally posted this fun tutorial on Kojo Designs a while back.  During my moving interim, I thought I would revisit it with y’all.
_______________________________________
If you’ve ever seen any of my tutorials,
then you know I love me a good knock off.
And naturally, one of my favorite sites to get ideas is Anthropologie.
I stumbled upon these beauties, and knew I wanted to try my own version.
{source: Anthropologie}
And now, for my version:


In my family, we have a Yo Yo quilt that has been passed down for 4 generations.  It is made with vintage fabric, and it makes my heart swoon.  The only problem, it has begun to tatter and fall apart. And the girls in our family have been trying to find alternate uses for the classic yo yo’s.  So I very carefully used a seam ripper to remove a handful of yo yo’s from the outer edge of my blanket–to use on this vintage project.

To make your own yo yo’s, see this tutorial.


  • Fabric Yo Yo’s
  • Bobby Pin blanks {available in jewelry section at Joann’s}
  • Buttons and/or scrap booking embellishments
  • Ribbon, tulle or any other extras you like
  • Scissors
  • Hot glue gun and glue

Lay out all your Yo Yo’s and start gettin’ creative as you make your button/yo yo combinations.

Grab your bobby pin base and add a drop of hot glue.
Place on the backside of a yo yo. Allow to cool.
Flip over and apply a drop of glue to the center of the front of your yo yo. Then place your button on top. Allow to cool.
Yep, it’s really that easy.

I hope you enjoyed the world’s easiest knock off project!
Happy Crafting!

>

Eye SPY: Handmade Edition

Show me all things handmade.
Be creative.
Crafts you have been working on,
gifts, home decor, etsy finds.
So long as its handmade,
it’s perfect for this link party.

Also, note that I keep the link party open for a week
so you have plenty of time to take your pictures and link up.

Click HERE, to get caught up on I SPY.

And here are my handmades.

I SPY my latest “handmade” project,
Leather Feather Earrings
{say that 3 times fast}

And for those of you who want to know how to make these bad boys for yourself, here is a little tutorial.


1) Leather scraps, available at Joann’s
2) Fabric scissors
3) Fish hook earrings, available at Joann’s
4) 4 jump rings, available at Joann’s
5) Large, thick sewing needle
6) Needle nose pliers
1) Cut out two feather shapes from the leather scraps.
2) Poke an extra large and thick needle through the top of each feather
3) Wriggle and twist the needle to be sure the hole stays open
4) See hole
5) Use the pliers to open one of the jump rings.
6) Slip the earring on the jump ring.
7) Use the pliers to open a second jump ring and put it through the hole in the leather. 
8) Now attache the two jump rings together and close with the pliers.

9) Use your fabric scissors to cut VERY thin slits at an angle all the way up the sides of the feather.
10) Then go back and cute a second very thin slit right along side the first cut.
11) Pull out the extra fabric.
12) Admire your new feather leather earrings.


I {heart} these and I may wear them every day.

I will link these feathers up to my favorite link parties found HERE.

And now, I SPY some other handmade loves of mine.

From left to right.
Photo Star: made for me by Love Stitched.
Trim lined vases that hold my knob collection.
My Favorite Things blocks, with spots for future babes.


My latest Silhouette project, my all-time favorite Scripture.
Yeah, I know, I know, I’m still working on having a steady hand.

My homemade salsa using the Pioneer Woman’s recipe.


My “in process” newly covered couch–handmade by my very talented Grandma.  I will reveal the whole thing once my Grandma finishes. 


My favorite painting, done by a young teenage artist at my Church.
I love this girl, and when I saw this painting, I knew I had to have it.
It reminds me of Baby W.
Now, time to show me your handmade goodies!

>

How to Make a Jewel Bib Necklace
(with a free template download}

I’ve seen these bib necklaces everywhere. J Crew, Anthropologie, Nordstroms.
And I have been meaning to make one of my very own for nearly a year now.
Well, I finally did it.
And let me tell you, it’s easy as pie.
Let’s make one together, mmkay.
Materials:
  • Download your FREE necklace template HERE.
  • One square foot of black felt
  • Package of gems: I purchased the 1 lb. package from Michael’s and I used my 40% OFF coupon. You will only end up using about 2 ounces of gems for one necklace.
  • Fabric scissors
  • Pins
  • Glue gun and hot glue
  • 3 feet of ribbon
First, download your FREE template here.
Carefully cut it out and then pin it to the center of your felt.
Use the pattern to cut out the felt in the shape of your bib necklace.

Set aside the felt scraps for later on.


Now, place your gems in the desired layout on your felt backing.
This may be tricky, so take your time until it looks just right.
I made mine symmetrical.

Once you have your layout, begin to glue down each gem–one by one.
I started from the edges and then worked my way in.

Once you have glued all the gems into place, flip over your felt and get ready to add the ribbon.  Keep the ribbon in one long single strand. Apply a dime size drop of glue to the top of the felt backing. Glue the ribbon about 1.5 inches down.  Repeat the step with the other side of the ribbon.


Now, take your set aside felt scraps and cut two 1.5 inch squares.


Apply another dime size drop of glue on top of the ribbon, and put the square felt on top.  This will hide the ribbon backing and give it a clean look.


Find the center of your ribbon and make your cut.


Then tie a bow. I kept the ribbon extra long {3 feet} so that I could have a larger bow. And that’s it!


I am excited to use the template to make some other bib necklaces.
Maybe a pom pom one, a button one, or a lace embellished one.
If you use this template for a necklace, I would love to see how your project turns out! Come back and leave a link in the comments.
Happy Crafting!
I will be linking up to some of these fun parties!
************************************************
Getting votes makes me smile.
All you have to do is click the link.
{you can click every day, if you want}
Top Mommy Blogs - Mom Blog Directory
What if I got to be #1 for a day?
I think that might be pure awesome.
***********************************************
Also, we will take a break from I SPY this week.
I have something else planned for us *wink*.

>

DIY Stencil Tote
How to stencil on your favorite tote or purse.
Perfect for canvas, burlap and cotton market bags.

Materials:
Canvas, cotton or burlap tote {I got mine from the sale section at Cost Plus}
Queen Bee Stencil from Your Memories Captured
Fabric paint
Sponge brush
Scotch Tape {not pictured}

{purchase stencil here}

First, securely tape your stencil in place.
Be sure you have smoothed the stencil out as much as possible, and that there are no wrinkles in the fabric.
It may be best to iron your fabric first.
Now, always remember that “less is more” when painting the stencil.
Apply a small amount of the fabric paint to your sponge brush and then dab the brush on a paper towel to remove any extra paint.
I like to hold down the part of the stencil that I will be painting in.
This way I can be sure that no paint gets outside the lines.
DAB, don’t brush the paint onto the stencil.
Like I said, less is more–so start with a thin first layer of paint over the entire stencil. Then paint another coat until you have your desired coverage.

If you hold the stencil in place like I do, then your fingers will look like this after.  The mark of a true crafter.

This is my stencil all painted in.
I purposely didn’t paint evenly because I wanted the more “worn out” and vintage look.

Slowly remove your stencil and allow the paint to dry.
It is easiest if you wash your stencil right away.
Just place under a stream of warm/hot water with a bit of dish soap.
You won’t even need to scrub–the paint will rinse right off.

And that’s it!

I have so many fun projects planned for this stencil:
  • burlap pillow
  • framed picture
  • place mats
  • cork board
Be sure to check out all the other inspiring stencils from
____________________________________________________
And I will see you tomorrow for the
I SPY: jewelry and shoes edition

>

Dear Silhouette, I love you.
{mustache rhinestone t-shirt, made using my Silhouette}
{Tuxedo t-shirt made using the Silhouette heat transfer material}
Silhouette Electronic Cutting Tool 
Dear Silhouette,
You have changed my life.
I’m serious.
I play with you nearly every day.
You are easy to use.
You inspire creativity within me.
You make me happy.
But you are also kinda like owning a truck on moving day.
Thanks to you, my dear Silhouette,
I am now the neighborhood go-to gal for all things crafty.
Need something cut into a super rad shape?
No prob, just stop by Ashley’s house,
she has a Silhouette.
And I’m not complaining,
because I love to help a sista out…
But I’m thinking these ladies {and a few gents} need a
Silhouette of their very own.
Which is why I want to thank you, Silhouette.
Thank you for the INSANELY awesome DISCOUNT
you are offering to all Little Miss Momma readers.
with love, LMM
the Silhouette DISCOUNT:
  • A Silhouette SD
  • the Rhinestone starter kit
  • 3 additional packs of rhinestones
  • and 1 Pick Me Up tool
ALL FOR $229!
This Rhinestone Bundle includes:
The Silhouette SD
2 sheets of rhinestone template material
2 sheets of rhinestone transfer tape
2 rhinestone backing boards
1 rhinestone placement brush
1 CD of rhinestone images
1 pack of clear 10ss rhinestones
1 pack of clear 16ss rhinestones
1 pack of clear 20ss rhinestones
1 pack of pink 10ss rhinestones and
1 Pick-Me-Up tool
This is an incredible deal worth $125 in savings!
This promotion will run from April 21st-April 26th.
PROMO CODE: LMM
You are able to put the entire bundle into your cart with one click.
CLICK HERE, and use the code LMM. 
If you already have a Silhouette, or are ordering one today,
you should add all the Rhinestone goodies to your basket
because from April 21st-26th they will be a whopping 30% OFF

Look what I made in 15 minutes using the Silhouette rhinestone feature.
I’m sorta in love with this new mustache tee.


I used the Silhouette rhinestone starter kit…


And followed the VERY simple instructions found in the package:
I also added a bit of BLING to my favorite burlap crown pillow.

I made this pillow using this stencil from Your Memories Captured.
Then I added a few rhinestones to jazz it up a bit.


This week I also made my new favorite shirt using the Silhouette heat transfer material.

I call it, the Tuxedo Shirt.

I used a bow tie image from the Silhouette library, and a button image–then I combined them to create this feminine tuxedo look. This is also a 15 minute project. Way easy.


I am thinking I want to wear it with a high waisted black or even red skirt to dress it up a bit–we’ll see.
I have about a zillion more ideas swirling around in my head,
if only there was more time in the day, right?!
So be sure to take advantage of this limited time discount.
These don’t happen often!
***********************************************
Dont’ forget to check out my latest tutorial
over at Mom Moments.
 And “like” Little Miss Momma on facebook for a chance to
WIN $25 to my etsy shop.

>

I’m over here today:  Teaching you how to make these Anthro-inspired vintage pretties: 

Stop by and say hi, will ya.
I would like that.


Photobucket

>

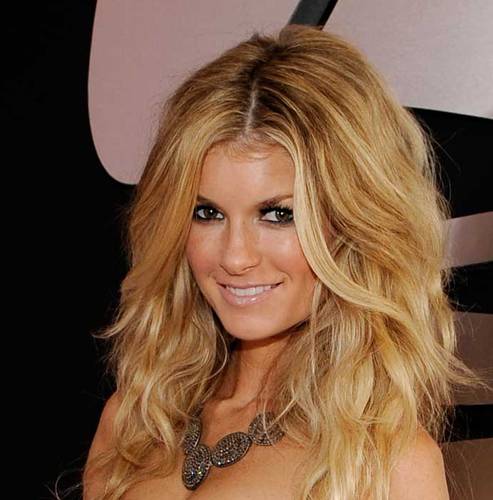
How to Curl Your Hair: Wavy Curls

Wavy hair makes me happy.  It means less blow drying, less brushing, less straightening, and more volume.


Many of you have emailed me wondering how I get the lose curls in my hair.
And honestly, I can’t take the credit.
I watched this tutorial on The Daybook and it changed my life.
Seriously, any tutorial that cuts the time it takes me to do my hair in HALF, is life altering.  Watch Sydney’s tutorial, it will change you life too.

However, we all have different hair, and therefore need different techniques to make certain styles work for us.  So I do a few things different than The Daybook, to make the look work for me.

And here’s what I do to create my messy curls:


My products:
Big Sexy Hair Spray
Garnier Fructis Wonder Waves
1.5 inch barrel curling iron
Straightener {optional} 


First I take a shower at night.
I brush through my hair, then spray about 4 pumps of the Wonder Waves. I part my hair the way I wear it normally. Then I scrunch my hair lightly, and wait for it to air dry. Sometimes, I blow dry my bangs so they don’t get to crazy. Once my hair is air dry {damp} I pull it back in a lose braid, and tuck my bangs behind my ears.
Then I go to bed.
When I wake up I look like this:


A lot of my hair has fallen out of the braid, but that’s ok.
Also note that I don’t braid my hair all the way to the bottom. I leave about 3.5 inches because I don’t like when the bottom of my hair gets all kinked.


Then I un-braid my hair. And it is in ULTRA messy/stringy waves. 


And I have cowlicks on my bangs.


So I take my straightener to my bangs.  I pull down all the front pieces and I straighten them together, curling the straightener under at the ends, so that the ends of my hair curl around my face just a bit.
Note: you must roll your eyes to the back of your head for this straightening technique to really work, see photo for reference.


I also straighten out any other weird kinked parts of my hair. I tend to like the soft straight look on top, and the curled look on the bottom–so I often straighten the top of my hair about 3 inches down, all the way around my head.


Now I am ready to start curling.  I put half my hair up in a pony tail.
What’s that? You’re noticing that my hair looks a bit weird like this…


That’s because this is where you can see my hair extensions.  They make up about 25% of my hair.  They don’t add any length, but they add volume.  Read this, if you’re new here and wondering why I need extensions.


I take the first chunk of hair, about this much…


And then I start curling from the MIDDLE first.
This is the MOST important trick I learned from Sydney.  I always wondered why my curls would fall out so quickly in the past–then I learned, that if you start your curl half way up the strand, it lasts waaaayyy longer.


Leave the curling iron there for about 10 seconds. Then loosen the grip and pull the curling iron down to the end of your hair.


Then re-roll it all the way up to the top.


Wait another 5-10 seconds and then slowly release the hair.


Then I use my fingers to lightly separate the curls.


Continue this step with the remaining hair.


Then take your hair out of the pony tail, and follow the same steps on the top. I like to curl the strands in front AWAY from my face–that way they have more of a “Charlie’s Angels” look.


Then spray once over with your hair spray.


And that’s it.
I can usually get this to last 2 days before washing again {or putting it up in a baseball cap}.


A bit messy, a bit curly–that’s the way I like it.


{outfit post for this to come soon}
******************************************************
Say hello to your fabulous sponsor,
not like she needs an introduction
since she is pretty much world famous and 100% awesome.

Photobucket
**************************************************************
And the WINNER of the Mod Memento GIVEAWAY
CONGRATS to comment #212
M.O.T.B said…
keegan + mandy
One boy…one girl…Flirted in science…She asked him out…He accepted…October 4th,1992…Love at 15…Snowball and baseball games…Heartbreak and betrayal…Distance could not erase…Phone calls and emails…15 years later…He climbed a ladder made my dreams come true…October 4th,2006…Forever…June 6th,2007 met the first living breathing symbol of their love…Aidan Kale…And February 14th, 2009 their second Kamden Kane…And that boy and that girl…haven’t looked back…
…to be continued
And there is still time to use your discount code:
15% OFF
code: MODMOMMA15
**************************************************
And today I am guest posting over at cool kids.
Please come say hi!


Visit Top Mommy Blogs To Vote For Me!

>

I just discovered a new blog,
and it makes me happy.

Eisy Morgan, is my new go-to blog for crafts, blogging tips, fun stories and every hair tutorial you can imagine!

Yep, there is even a tutorial for the super hot Marissa Miller look.


And today, we are lucky enough to have the super beautiful and talented author of Eisy Morgan here with us–meet Ashley.

******************************************

Hi, I am Ashley:)

I run a little blog called
EisyMorgan all about inspiring women
and I am so thrilled to have the 
privileged of sharing a tutorial with you
for Ashley here at 
Little Miss Momma!
If you are reading this 
you don’t have to ask me why, 
because you are here following every post she puts out!
So in the spirit of all things ASHLEY
I am going to show you how to make a cute,
glittery, headband with items you might
have in your craft area right now!! 
So let’s get started on 
How to make your own 
Dragonfly Glitter Headband
What you will need:
  • Tiny beads
  • Headband: I picked up a pack of 4 for a $1.00 at Walgreens!
  • Felt
  • Hot Glue Gun
  • Scissors
  • Sharpie
How to do it:
  • Take your Sharpie and draw a dragonfly (or whatever shape you might want!)
  • Cut out your shape
  • Spread your tiny beads out on a piece of scrap paper

  • Cover a small area of the felt completely with hot glue
  • Place glue covered felt into beads (don’t press down too hard or for too long as it tends to stick to your paper or get too much glue on the left over beads)
  • Let dry. This only takes about a minute
  • Cover entire area of felt
  • Brush off any loose beads
  • cut a small piece of felt that will cover your headband but you can’t see behind your shape
  • hot glue over the headband attaching to your shape

That’s it! 
Put it on and your ready

       with your one of a kind headband!! 

****************************************************************

Have you entered our latest and greatest giveaways yet?
Photobucket

Photobucket
and there is still time to join our March Madness Bracket!!!  It’s gonna be off-the-hook people!
{click HERE for details}

>

How to Make a Lace Tie Bracelet
{using scrap fabric}


My creative wheels are struggling lately,
so I totally understand if you hate this tutorial.
But I sorta hope you don’t.

You can make this no-sew bracelet in 5 minutes, no joke.


Bust out your fabric and lace scraps and glue gun,
and that’s all you need.


First you need to make a 2 x 20 inch strip of fabric for your base.  I used basic muslin fabric for my base.  First, I cut a little slit {about 1/2 an inch} and then I ripped it the rest of the way so that the edges fray.


Then I laid out the scraps I decided to use.


Take the scrap lace you want to use first and measure it around your wrist.
Trim all the lace scraps to be this length.


Apply glue on the top edge of the lace scrap
and then place on bottom of the strip of muslin.


Glue down the next strip just above the other.


Then glue down the final scrap.
You don’t need to use very much glue.


Then tie it in a casual bow around your wrist, and flaunt it.


Happy Crafting!

I will be linking this tutorial up at these radical parties.
_________________________________________
Divine blankets for your babes:

Photobucket
Baby W adores his lovey blankee!

>

How I Put My Face On:
Little Miss Momma’s Make Up
{Some of you asked, so now I’m telling.}

Warning: I don’t know what I’m doing. 
I am not an authority on the do’s and don’ts of the “art of makeup”. 
I do things like lick a q-tip and then wipe off smeared mascara. 
I can’t live without lip gloss.
My eyebrows are two different shapes,
likely as a result of some plucking mishap in the past.
There is nothing I despise more
than putting on mascara–it feels like a chore,
but like many girlies, I feel naked without it.

So take whatever you read here with a grain of salt,
and then go find some other blog where the girl actually knows what she’s doing.

Here is the makeup I use right now.

1. Bare Escentuals Mineral Foundation. Shade: Light {Sephora}
2. Bare Escentuals Bronzer. Shade: Faux Tan {Spehora}
3.Sonia Kashuk Blush {Sephora}
4. Benefit cream to powder foundation stick Shade: Paper Dolls {Sephora}
5. Stila Eyeshadow Trio. Shade: Gold Glow {Sephora}
6. Stila Smudge Pot. I use this as eye liner. {Sephora}
7. Lancome Hypnose Drama Mascara. Shade: Black {Sephora}
8. Eye lash curler. {anywhere}
9. Lorac Lip Stain. Shade: Sweet Emotion–see below. {Sephora}

First I take my Benefit concealer and I color over all my blemishes.  You’ll notice there are A LOT of dots.


Then I take a sponge and blend in all the concealer.
Yes, it’s time for me to get a new sponge–ick.


Then I apply the bronzer. This is my MUST have make-up. Without it, I look pale and sick.  I once read in a magazine that you should apply bronzer wherever you would get a sunburn.  It should not be applied ALL over your face–that’s what I read anyway.


{right after bronzer}


Now I apply my mineral foundation over the top of the bronzer. This will help blend the bronzer and hide the rest of my pesky zits.


Then I use my blush and apply just on top of my cheekbones.


Now the basics are done, but I still look bleh until I put on my eye makeup.


I LOVE this Gold Glow Eyeshadow Trio by Stila.


First I apply the lightest shade one to my entire eye lid, and just a little teeny bit underneath the bottom of my eye.


Next I use both of the darker colors and apply to the upper crease of my eye lids, like so:


I use an eyeliner brush to apply a quick line of the Stila Smudge Pot under my eyes. I don’t use eyeliner on my upper eyelid, simply because I don’t know how to put it on.


Then I curl my eyelashes and put on my waterproof, black mascara.

But I still have my secret little somethin somethin left to put on.
My all-powerful, and very sassy Lorac lip stain, followed by a layer of lip gloss.

And that’s it.
Nothing special.


{Happy Mommy necklace by Starfish}
What make-up can you not live without???
____________________________
And the WINNER of the
Vintage Wanna Bee giveaway is:
Comment #132

 CONGRATS!Email me at ashley@littlemissmomma.com for details on your big WIN!